Tag Archives: Fieldwork

Geoarchaeology on the Fort Davis Archaeology Project

Written by Erin Rodriguez, FODAAP co-director and geoarchaeologist

If you’ve ever stopped by FODAAP excavations, you may have seen something like this:

IMG_7168

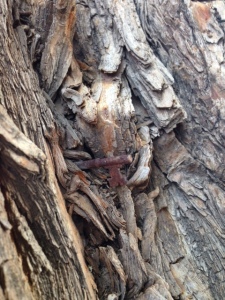
In this photo I am taking a micromorphology sample from a shovel test pit excavated during our 2014 season. As a geoarchaeologist, I use geological methods to study archaeological issues – understanding the human past through material remains. In this case those material remains are the actual sediments and soils that we as archaeologists excavate in order to recover artifacts, map architecture, and analyze the spatial contexts of archaeological materials. These sediments are fundamentally important as they allow us to understand the context of recovered materials which is the basis of scientific archaeological investigations. Further, human activity (as well as animal, plant, and environmental actions and processes) leaves traces on sediments and soils that can be reconstructed through detailed and careful analysis.

UCB FODAAP Micromorphology
UCB FODAAP Micromorphology Sample

The primarily methods of geoarchaeological analysis that I use as part of the Fort Davis Archaeological Project are microscale analyses looking at microscopic physical relationships between sediment features as well as chemical aspects of soils such as organic matter content, pH, and phosphate and heavy metal concentrations. In the image at the beginning of this post I am taking a micromorphology sample – an undisturbed block of sediment which will be impregnated with resin and cut into ultrathin microscope slides so I can analyze the spatial relationships between sediment components. This allows me to better understand relationships between features observed in the field, to identify microscopic sediment components that provide new information about archaeological deposits, and to reconstruct the processes which create and effect archaeological sites.

UCB FODAAP Micromorphology

The image above shows how a slide from a micromorphology sample relates to a profile from a unit excavated by FODAAP in 2014. This particular slide showed the presence of localized burning of a trash deposit which was not identified during excavation. The burning is only in one slide from part of this excavation unit, so it may have been an intentional burn as part of maintenance or cleaning of the dump.  This slide also contains microremains from artifacts found in the trash deposit (metal fragments, glass shards, eggshell) as well as evidence of insect activity.

UCB FODAAP Micromorphology

Micromorphology, as well as other microscale geoarchaeological analyses, has the potential to provide essential information about human activities, processes which create archaeological sites, and factors which can effect sites over time such as erosion, animal activity, and other factors. While as not commonly represented in archaeological explanations, geoarchaeological data enriches our interpretations of the past and enables us to better understand the lives and actions of past people.


Excavations at the Overland Trail Museum

Written by Richard Terk (2014 FODAAP Field School Student)

2014 Field School
2014 Field School

Excavating at the Overland Trail Museum was a wonderful experience. Not only did I get the opportunity to peel back a few layers of Nick Mersfelder and Fort Davis history, I got the chance to meet a few members of the Fort Davis community and visitors to Jeff Davis County.

In recent years, a significant amount of soil movement took place in the backyard of the Overland Trail Museum which as you may know, was the home of Nick Mersfelder, one of Fort Davis’ more colorful characters during the late 1800s to mid 1900s. I excavated a 1×1 meter unit right behind what I was told was Mersfelder’s court room. The unit was right up against the building and just north of the courtroom’s back door. In the top layers of soil I found numerous nails of modern production, i.e. wire nails. The further down I dug, I saw the gradual transition from modern wire nails to the older cut nails.

An interesting layer of soil I came across was a one that appeared to have been a garden. Unlike most of the layers I was digging through which were compact layers of tan or light brown with a moderate amount of rocks, this one layer was extremely dark brown, almost black with no rocks and was not compact. The interesting bit about this layer was that right on top of it I found the remains of tubers, most likely potatoes. Was this Nick Mersfelder’s garden and if so, what else could he have been growing in that small patch of dirt? This brings to mind what his diet might have been like. Considering he was born in Germany, did Mersfelder hold on to some of the cuisine from his native homeland or did he fully adopt the culinary traditions of his chosen community?

Finally, I would like to thank the people who came out to speak with me at the museum. It was great to talk with people who have an interest in history and archaeology. Hearing your stories about Fort Davis and the history of Nick’s house made piecing together what I was seeing under the surface make a bit more sense.

A special thanks to Bobby for telling me about the old ditch.

Shovel Testing – archaeology in the field

IMG_7368

STP. The acronym looms large in archaeology lingo and stands for Shovel Test Pit. Not the most glamorous of archaeological methods, the STP is a tried and true way to test a site.

~What are they?~

Shovel Test Pits (STPs) and Shovel Test Units (STUs) are pretty much what they sound like: small pits or “units,” dug mostly with a shovel. Usually smaller than a normal excavation unit, the pits are quick, accurate ways to get a glimpse into the guts of a site. Hence the “test” in test pit.

~Why do we dig them?~

STPs and STUs are part of the testing or survey phase of an archaeological project. Usually done after preliminary research, and before and during large scale excavation, this phase includes a variety of methods for getting a sense of the big picture of a location, rather than the nitty gritty details. Alongside pedestrian survey (walking around and seeing what’s on the surface) and remote sensing (using high tech instruments to probe into the ground without digging), shovel test pits are windows into the site that allow us to decide where to dig and produce useful data across a large area that would be impossible to excavate completely.

STP/Us help locate not only interesting stuff for further investigation, they also help locate areas where there is *no* archaeology. That way, we know that we aren’t missing anything good! Even so, where there are no obvious artifacts or culturally deposited sediment, geoarchaeologists can learn a lot from “sterile” units. Knowing more about the geological characteristics of the site is invaluable for later excavation, and both sterile and artifact rich units can be analyzed for geological and soil analyses.

~How do we do it?~

STPs and STUs can be part of what archaeologists call “judgmental or purposive sampling” or “random sampling.” In the case of the first, “judgmental sampling” archaeologists decide where to place the pits based on what they already know about the site (what we can see on the ground, what historic records suggest about the location of interesting features, or what the geology indicates about deposition and preservation). In “random sampling,” pits will be placed across the site in a truly random manner to help support assumptions about where features are located and the density of artifacts. Most strategies are a combination of the two.

Once we’ve decided where to put the STPs, the general idea is to dig as deep as necessary to hit every cultural layer. This can be centimeters deep or meter deep depending on how long the site was used and the quality of preservation. Since part of the testing purpose of STPs is to be able to quickly gain a broad range of information, they are often excavated in arbitrary levels. These levels are a set number of centimeters deep, regardless of the contents. This provides a control across the STPs so they are easily compared later. A combination of arbitrary and “natural” levels (excavating along the changes in stratigraphy) can be used as well. This is what changes an STP into an STU, because natural levels require closer consideration, and even trowel excavation.

~What did we find?~

Our goal was to confirm the edges of the densest artifact scatters visible on the surface, and get a better sense of the stratigraphy (layers of different sediment and artifact deposits) and geology across the site. This gives us both horizontal data (information from across a wide area) and vertical information (glimpses into how deep deposits go) that can inform further excavation or testing. Each STP was 50cm wide by 50cm tall and at least 30 cm deep. Us lucky STP diggers got to start at the top and dig either until 30 cm below the surface or however long it took to stop seeing traces of human activity.

All of these rules produced some interesting results. In most of the STPs that showed any cultural material, the deposits were no more than 10-15 cm below the surface. They included the range of historic material we were expecting: metal artifacts like bullet casings, nails and bolts, small animal bone, pieces of ceramic dishware, and shards of glass, along with deposits of charcoal and ash.

One STP in the center of a large surface artifact scatter was placed explicitly to explore a heavy concentration of material associated with horseshoeing activities. The STP revealed that the scatter was only surface deep and not associated with any architecture or forge feature below. This information helped us explore the possibility of mobile farriers and reinforced our inklings about the use of the field for cavalry and civilian equestrian activity.

Most excitingly, an STP at the far edge of the test area yielded a metal helmet plume stand from an 1880s cavalry helmet. Complete with decoration of a shield with stars and stripes and an Eagle holding arrows, the plume stand adds evidence to the claim that this field was used in Military skirmish drills during the occupation of Fort Davis. The thin layer of cultural material also suggests that the entire area was used for occasional dumping of stove ash or other trash over the last 100 plus years.

Alongside surface collection and excavation, the STPs we dug this summer helped us understand that the site was used over a long period of time and for a variety of uses, a majority of which leave very shallow traces in the archaeological record. Most importantly, they helped us connect this area to both civilian populations and military populations during the Fort Period.

Excavations at the Smith-Carlton Casa Vieja

IMGP2202

Post by FODAAP 2014 Student Elizabeth Flores

I have worked on two different units, one at the Francell property (next to the Post Office!) and another at the “Casa Vieja” house. While both have very interesting stories to tell I would like to focus my attention on the Casa Vieja site which had some features that were, in my experience, unusual to work with. I worked in Unit 3, next to one of the doorways.
To begin I first had to set up my unit which is generally a one by one meter square. In order to prevent any damage to the foundation and adobe wall of the house, about five centimeters of the unit included the wall. This way I could avoid scraping against the wall if it tapered into the unit unexpectedly. Another benefit to having the wall in the unit was being able to see how far down the foundation went. From there I could begin my surface collection which is basically scanning the area inside the square for any artifacts and clearing it of bothersome debris like loose roots and large rocks. Artifacts on the surface are generally the most recent and worn down from the weather. Many times artifacts are moved from where they were originally or moved by other natural forces.

From there I removed the first context layer of dirt. In this unit it was the extremely loose and sandy surface soil that can be found just about anywhere around the property. Usually any surface artifacts can be buried beneath this loose layer which would make sense to find similar kinds of artifacts like glass, ceramic or lithics. The second context was the same kind of dirt only more compact. In this context a giant cottonwood root went straight through the unit. It was really hard to work around it! Eventually, David helped me out and removed it after half a day’s time of hacking at it. Thanks! Roots can also cause some changes to the soil and artifact distribution. As the root grows and decomposes, the soil surrounding it can become soft and mulchy. Also, roots can grow through artifacts and drag them along. For my unit a large number of glass shards were found around the root.

Ending context two soon after the root was removed I quickly realized that there were two very different kinds of soils beneath context two. Context three and four were excavated at the same time as abutting, or “adjacent” layers. Context three was flush against the cement covered adobe wall and formed a loose trench like pit. Using a trowel, I was able to figure out the boundary between the two contexts. It was a very narrow context, only about fifteen centimeters from the wall. This trench probably existed because it was excavated at one point or another to cover the adobe with a layer of cement to protect it. After ten centimeters of the same dirt in the trench and no apparent change in sight I began a subcontext called context 3B which went on for several more centimeters.

As I had mentioned before context four was an extremely compact layer with light colored sand. It was extremely difficult to excavate and I had to resort to using a handpick to get through it. Though this may seem like a cumbersome and useless thing to note, even how heavily compacted an area is can tell us something. My unit was placed right next to a door and the compact area was probably associated to the traffic from the walkway. Below the hard layer was a slightly less compact version, context six with gray ash or cement patches scattered around. There was also degraded adobe probably from a time where the house was in need of repair.

The end of context five was really noticeable by the change of the previous dirt to a reddish brown colored sand with many more pebble and cobble inclusions. From this point on there were no more artifacts found, the last piece being part of the adobe wall. However, just to make sure that there really is nothing else in the context, I continued on for ten more centimeters. When the dirt does not change for a while and no more artifacts can be found we call this “sterile ground”. Reaching sterile ground marks the end of the unit.

To finish off I made the walls as neat as possible and proceeded to map the bottom of the unit and the four walls. I did this because after the final pictures are taken and the unit is filled the maps will be the best record to see what went on while excavating the unit. And then we’re done!

A Key in a Tree

tree key

As archaeologists we’re constantly staring down at the ground, looking for the smallest traces of past activities. But, this photo is a reminder that artifacts can be found anywhere, and that the processes of time can distort the original location of material remains- aspects of the archaeological record that archaeologists are always forced to consider.

This skeleton key, also called a lever or bit key, was found imbedded at a fork in the trunk of a bodark tree roughly six feet above the ground! How did this artifact get to this unusual place and what does this key in its unique location tell us about historic activities at the property? Thinking through this situation will provide a peculiar case study to illustrate how archaeologists view artifacts and the ways in which we use micro and macro scales of context along with other lines of evidence to think about the past.

If we step back from the location of the key and look at the larger context of the site we can see that the tree with the imbedded key is itself actually a product of past human activity. What is now a row of trees lining the front of the Smith-Carlton House (La Casa Vieja) actually began as a fencerow. We know from historical documents and oral history that the front of the property was fenced-in using hand-hewn posts made from the bodark tree (Maclura pomifera)- a close-grained and heavy wooded tree that has long been used by humans for windbreak, handles, and, as in this case, fence posts.

fence line

Surprisingly, it appears that the original fence posts were able to root and slowly began growing into new bodark trees. We know that they originated as cut fence posts rather than simply using young bodark trees as fence posts because in one of the trees the original hewn post is still visible in the trunk, although it is largely covered by growth.

So, how did this key come to be in the middle of the tree today? My hypothesis would be that the fencepost, in its earlier squarer shape, would have been a convenient spot to place a key. The key was found in the corner post/tree which would have likely served as the access area between the house/stable and the apple orchard to the southwest. When the fence wire or strands were cut, the orchard abandoned, or the activity associated with the use of the key stopped, the key was able to rest in place on the post long enough for the tree to grow around it, trapping it in the trunk. Alternatively, the key may have been hidden on the post when it was a smaller tree. The fork of the tree as it grew from the earlier post would have been a convenient hiding place; out of plain sight for non-family members, but easy to locate for people who would need access to the property. The features of the tree in its earlier form may have functioned much like the fake rock “hide-a-key” of today.

In either case, the activity associated with the key must have ceased at some point in the past, or the location of the key was forgotten for a long enough period that the tree could grow around the artifact. If we could cut the tree at the location of the key and count the tree rings, it could be possible to get a rough date for when the key was abandoned. Counting the rings from the from the bark inward to the key would tell us roughly how many years ago the key was left.

Beyond being an interesting artifact in an even more interesting location, the particularities of this case provide a great example to illustrate how archaeologists make sense of the things they find. The skeleton key itself is an interesting find, but what is really neat is where it was found, and its association to other features on the site. To talk about past human activities and practices- which is what archaeologists are really interested in doing- we have to look at where the key was found in the tree, the association of the tree to other trees on the property, and the association of the row of trees to the structures and the living and working spaces of the house. We also have to look at historical documents and photos and talk to living people who remember when the trees still served as a fence posts. We have to research the type of tree, the unique features of its wood, and its traditional uses by humans in the American West. Tracing back the human processes involved in cutting the posts and building a fence, along with the natural process of tree growth, we are able to incorporate these multiple lines of evidence to create multiple interpretations about how the key came to be where we found it, and what it may have been used for. These interpretations serve as ideas and working hypotheses that are constantly re-addressed as more evidence comes to the surface. As excavations and documentary research continue our ideas change and become more refined, continuously creating a more vivid and humanistic picture of the past.

Do any of you have different interpretations for how the key ended up in the tree trunk or what this unique location can tell us about the past residents of La Casa Vieja? We’d love to hear your thoughts in the comments below!
-post by FODAAP Staff Member: David Hyde